Pages

Thursday, May 26, 2011

Binding Part II - Knife edge

This is how I do it. I don't know if it is the "right" way or if there is a better way because I don't see too much written about knife-edge bindings. This is what I do when I want the quilt to end just the way it is without the frame that regular binding adds to the edge.

I cut strips about 1 1/2-inches wide and a couple inches longer than the side of the quilt.
Sew the strips to the quilt front using a quarter-inch seam,
starting and stopping a quarter inch from the edge.
Press the strips away from the quilt front.

With the back of the quilt facing you,
fold one binding strip over to meet the quilt edge, and press.

Fold the binding strip again along the quilt edge, press if needed,
and pin the binding to the back of the quilt.
On the front of the quilt, you should see only the quilt.
On the back, you should see only the binding. 


Hand sew the binding to the back of the quilt,
and trim the strip ends even with the quilt.
Repeat for the opposite side of the quilt, sewing the binding strip in place and trimming.
Now, trim the short ends of the remaining strips about a half inch from the quilt edge,
and fold it in on itself so the folded edge is even with the quilt edge.
Then fold the strip along the length to meet the long quilt edge and press,
like you did before. 

Fold the strip again along the long quilt edge and pin to the backing.
You should see only the quilt from the front, and only the binding from the back. 

This is what my end looks like with the strips folded, but not yet sewn in place.

Sew the binding strip to the back of the quilt.

Sew the binding along the short ends, tucking in the folded edges.
Hope this makes sense! If you have an easier or better way, please share.

Sunday, May 22, 2011

Binding Part I - Joining the ends

Thinking that someone might find my binding methods helpful, I took pictures for a post last fall. Can you have blog UFOs? Finally, here's how I join the ends of regular binding when attaching to a quilt.

I'm skipping the part where you sew the binding on and turn corners. That's covered in lots of other places and usually pretty much the same wherever you find instructions. This post is about joining the last two ends of the binding together. I thought I was using the Fons and Porter method, but I just looked in their "Quilter's Complete Guide" and it's not exactly what I do. Not sure where I learned this then, but it is fairly easy, and the final seam looks like all the other seams in the binding if you joined your binding strips on a 45-degree angle.

Stop attaching the binding to the quilt a good 10 inches from where you started
so you have room to maneuver the pieces.
Make sure the start end is trimmed at a 45 degree angle. 

Tuck the beginning piece into the end piece, making sure the pieces are flat
and as taut as you'd want them in the finished binding.

Draw along the angled edge of your binding to mark the end piece.


Pull the end piece out and extend the line across the width of the binding.
Make sure the line is at a 45-degree angle from the strip edge.
Then, mark another line a HALF inch from your mark,
closer to the edge of the binding strip and away from the attached end.
The half inch is the quarter-inch seam allowance for the two ends.


Trim along this second line.  

With right sides together (and making sure you don't have a twist in the strips),
line up cut ends of binding strips, offsetting them slightly
so that your quarter-inch seam will start and end
in the V formed by the two pieces.

Press the seams open, and stitch the last part of the binding to the quilt.
Turn the binding to the back and sew in place as usual.
I hope this was helpful and that it makes sense!

Thursday, May 19, 2011

The process

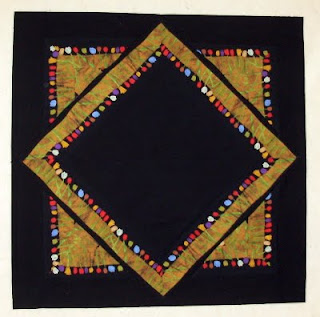
I usually forget to take pictures along the way. This time I didn't! So here's a look at the process of making what will some day become a table topper from this Nancy Crow fabric I had for years and years and finally cut into.
I cut the striped fabric so I could mitre it around a black center square.
I wanted the center unpieced so a vase wouldn't wobble if placed in the center.
The leftover mitred pieces look good made into corner triangles.

Seeing how it looks with more black on the outside. Good.
But the center square is too straight.
How about a wavy black line around the edge?

Using the Ricky Timms method, I layered the black fabric right side up
under the center square so the fabrics overlap a bit.

Then I cut gentle curves through both layers and removed the extra fabric.
Flip the black on top of the tulip fabric and slowly sew the two pieces together.
No need for pins. Go slow and align the fabrics as they reach the needle.

Ta da! A gentle curve that matches the feel of the tulip fabric.

I repeated this again to add the corner triangles.
Now all I have to do is quilt and bind it.

Sunday, May 15, 2011

Now for the setting

The four finished Prairie Flower blocks together.
I finally finished my Prairie Flower block. Four done. I keep thinking it would be better to do the original six I'd planned, but I'm afraid that would mean years and years would go by before I got to thinking about settings again.


Just can't get away from half-square triangles.
 Along with the fabric from the blocks, I saved this April 2007 American Patchwork & Quilting magazine for the setting idea in it. Actually, the sashing idea. I'm not going to applique a border. It really would take years for me to finish it then!

Saturday, May 14, 2011

Winding Ways

Signed it after I took the photo.
Victoria is looking for 6-inch signature blocks, and I found these templates in a rummage through my sewing cabinet. I've had them for years and years, but hadn't gotten around to even making one block. Now I have.

The templates are great. Metal with a sandpaper-like backing so they grip the fabric, and I could use my small rotary quilter to cut out the fabric.

Pinned at the center, a little ways from the end, and at the end point.
The pins through the end dots come out, and
the piece is flipped so the concave piece is on top when sewing.
The instructions with the templates gave piecing and pressing instructions. The curves were easy to piece. I put a pin straight through the end points to match them and then pin. I also pin a bit before the last end point, and in most cases I match the centers and pin. Four pins total. Keep the concave piece on top. That's the one that looks like a cave: (  Sew slow and align the fabric as you go. Curves are not really hard, but sometimes small pieces are hard to handle. 

Monday, May 9, 2011

Fabric, fabric, fabric!

The week before I went on vacation, I headed to the two closest quilt shops to look for fabric for a particular project. Didn't find what I wanted, but I did find these.

And these that go with another piece I'd bought earlier.

And these two pieces from the clearance section. Pretty backs for some future quilt.

Then on vacation I discovered Heartfelt Quilting and Sewing completely by accident. I ended up spending two hours there wandering through the shop. Good thing I don't live close or I'd be in BIG trouble. The shop is huge with a nice selection of Civil War reproductions, 1930s reproductions, batiks, novelties, Asian fabrics, solids, current fabric lines, threads, fusibles, buttons, rulers, books, purse making notions, etc. I've never seen a shop with such a good variety of quilting fabrics and so many sewing tools. The shop also has a couple longarms that you can learn on and then rent to quilt your own quilts. I would love to do that and see how I like longarm quilting.

When you buy fabric without a particular quilt in mind, how much do you buy? I get fat quarters when they are available, but when they aren't I have a hard time deciding how much. How much for a main fabric piece that could be a border? How much for something that will be used in blocks?

Sunday, May 8, 2011

Winning hexagons

I won this lovely book (in English) on hexagons from the giveaway on the Ildico Textildesign blog. The book, by Hilde Klatt and Liesel Niesner, documents Liesel's Hexagon Technique. I have long been thinking of making a quilt with hexagons. I have at least two hexagon rulers, an old hexagon book that doesn't explain how to make them, and at one point a very large collection of magazine subscription cards that I thought would make excellent hexagon papers. I have made some pieced hexagons before, but never took the plunge into hand sewing them until now.

The book I won has lots of good information, step-by-step instructions with pictures, tons of tips and ideas plus pages and pages of different grids to help you design your own quilts. I took the book with me on vacation to read, and yesterday I sat myself down and drafted my first template. Then I pulled subscription cards out of some magazines and scraps out of my giant bin and got to work. This morning I finished the last seams on my first hexagon flower. Now I'm hooked! I need to work a bit on my drafting. I think I can do better.

Thanks to Ann Champion's blog where I saw this entry that got me following the Ildico Textildesign blog where I entered the giveaway, won and finally took the paper-piecing hexagon plunge.

Thank you, Liesel and Hilde!